

In This Article
Part 1: Your First Step Away from Back Pain
For those grappling with the persistent ache of a sore back, the path to relief can feel confusing.
However, a powerful solution is within your reach. Targeted, gentle exercise is one of the most effective, evidence-based ways to relieve most common types of lower back pain.
By strengthening crucial support muscles and improving flexibility, you can build a more resilient spine and reclaim your comfort.
If you’re experiencing back pain, you are far from alone. It is a global phenomenon of staggering proportions.
According to a landmark study published in The Lancet and supported by the World Health Organization (WHO), low back pain is the single leading cause of disability worldwide.
In 2020, an estimated 619 million people were affected, a number projected to rise to 843 million by 2050 due to population growth and aging.
This isn’t just a statistic, it represents millions of lives disrupted by pain that limits work, recreation, and the simple joys of daily movement.
The debilitating nature of back pain can create a frustrating cycle of discomfort and inactivity. But this guide is designed to break that cycle.
We will provide a clear, safe, and actionable plan rooted in scientific principles.
You will learn not just *what* exercises to do, but *why* they are so effective, *how* to perform them with perfect form to prevent injury, and *how* to integrate them into a sustainable routine that fits your life.
This is more than a list of movements, it’s a comprehensive framework for understanding your body and empowering you to take control of your spinal health.
Let’s explore the foundational movements that can help you regain control and live with less pain.
Part 2: Why Is Exercise the Gold Standard for Managing Back Pain?
For decades, the conventional wisdom for an aching back was bed rest.
We now know this advice is not only outdated but often counterproductive. Modern research overwhelmingly supports active recovery.
But why is movement so medicinal for the spine? The answer lies in understanding the complex interplay between our muscles, joints, and nervous system.
The Vicious Cycle of Inactivity and Pain
When back pain strikes, our natural instinct is to stop moving to avoid further discomfort.
While a short period of rest can be helpful for an acute injury, prolonged inactivity initiates a detrimental cascade known as the “fear-avoidance model”.
- Pain Experience: An injury or strain causes an initial pain signal.
- Pain Catastrophizing: The individual develops a negative mindset, fearing the pain and its potential consequences.
- Fear of Movement: This fear leads to the avoidance of physical activities that might provoke the pain.
- Deconditioning: The muscles that support the spine—the core, back, and glutes—weaken from disuse. The spine becomes stiff, and overall physical fitness declines.
- Increased Pain: A weaker, stiffer back is more susceptible to strain and has a lower threshold for pain. This reinforces the initial fear, creating a self-perpetuating cycle of more pain and less movement.
Exercise directly intervenes in this cycle by reversing the deconditioning and retraining the brain to understand that movement can be safe and beneficial.
The Science of Movement for Back Health
A well-designed exercise program addresses back pain from multiple physiological angles:
- Strengthening the “Natural Brace”: Your core is not just your six-pack abs. It’s a 360-degree cylinder of muscles including the deep transverse abdominis, the back-stabilizing multifidus, the pelvic floor, and the diaphragm. When these muscles work in concert, they create intra-abdominal pressure, which acts like a natural corset to support and unload the lumbar spine. Research consistently shows a strong link between core muscle endurance and a lower risk of lower back pain.
- Improving Flexibility and Mobility: Tight muscles can pull the spine out of its neutral alignment. For example, tight hamstrings can pull the pelvis down (posterior tilt), flattening the natural curve of the lower back. Tight hip flexors can pull the pelvis forward (anterior tilt), creating an excessive arch. Stretching these key muscle groups reduces the passive tension on the spine, allowing for better posture and less strain.
- Boosting Blood Flow and Healing: Movement is crucial for tissue nutrition. Many structures in the spine, like the intervertebral discs, have a limited blood supply. The pumping action of movement helps deliver oxygen-rich blood and vital nutrients to these tissues while flushing out inflammatory waste products. This process is essential for healing and reducing chemical irritation around nerve roots.
- Releasing the Body’s Natural Painkillers: Exercise is a potent analgesic. Physical activity stimulates the release of endorphins, which are neurochemicals that bind to opioid receptors in the brain, effectively reducing pain perception. This creates a sense of well-being and can help break the psychological grip of chronic pain.
As stated in clinical guidelines published in the Journal of Orthopaedic & Sports Physical Therapy, “Clinicians should consider using trunk muscle activation and movement control exercises for patients with chronic low back pain… Exercise training is recommended to reduce pain and disability.”
By embracing a safe and progressive exercise plan, you are not just treating the symptoms of back pain, you are addressing its root causes and building a stronger, more resilient foundation for a pain-free future.
Part 3: The 8 Best Exercises for Lower Back Pain Relief
Here we present eight foundational exercises, selected for their proven effectiveness and safety in managing lower back pain.
Each movement is designed to build stability, improve mobility, and reduce strain on your lumbar spine.
Remember to listen to your body and follow the “Pain Rule”: stop if you feel any sharp, stabbing, or radiating pain.
1. The Bird-Dog: Master of Stability
Why It Works for Back Pain: The Bird-Dog is a gold-standard exercise recommended by physical therapists for enhancing core stability without putting flexion stress on the lumbar spine.
It teaches your body to engage the deep abdominal and back muscles (especially the multifidus and erector spinae) to keep the pelvis and spine neutral while the limbs are in motion.
This is a critical skill for protecting your back during daily activities like walking, lifting, and reaching.
Step-by-Step Instructions:
- Starting Position: Begin on all fours in a “tabletop” position. Your hands should be directly under your shoulders, and your knees directly under your hips. Your back should be flat and neutral—not arched or rounded.
- The Movement: Engage your core by gently drawing your belly button towards your spine. Simultaneously, slowly extend your right arm straight forward and your left leg straight back.
- The Hold: Hold this position for 3-5 seconds, focusing on keeping your torso and hips perfectly still and level.
- Return & Repetition: Slowly and with control, return your arm and leg to the starting position. Repeat on the other side (left arm, right leg). This is one repetition. Aim for 8-12 repetitions per side.
Pro-Tips & Common Mistakes:
- ✅ Focus On: Imagine a glass of water on your lower back that you don’t want to spill. This mental cue helps maintain a stable, level pelvis. Keep your gaze down towards the floor to keep your neck in line with your spine.
- ❌ Avoid: Avoid arching your lower back as you lift your leg. Don’t raise your leg or arm higher than your torso, as this can cause compression. Avoid rotating your hips.
Modification for Beginners: If the full movement is too challenging, start by lifting only one limb at a time. First, practice extending just one leg, then just one arm. Once you can do this without your torso moving, progress to the full exercise.
2. The Dead Bug: Deep Core Control
Why It Works for Back Pain: The Dead Bug is another exceptional exercise for developing deep core control without loading the spine.
It specifically targets the transverse abdominis, the deepest abdominal muscle that acts as a natural corset for your spine.
By learning to keep your lower back stable against the floor while moving your limbs, you build profound stability that translates directly to back pain relief.
Step-by-Step Instructions:
- Starting Position: Lie on your back with your knees bent and your feet flat on the floor. Raise your arms straight up towards the ceiling. Then, lift your feet off the floor and bend your knees to a 90-degree angle (tabletop position).
- The Movement: Gently press your lower back into the floor to engage your core. Slowly lower your right arm and left leg towards the floor simultaneously. Go only as low as you can without your lower back arching off the floor.
- The Hold: Briefly pause at the lowest point of the movement.
- Return & Repetition: With control, return to the starting position. Repeat with the opposite arm and leg (left arm, right leg). This is one repetition. Aim for 10-15 repetitions per side.
Pro-Tips & Common Mistakes:
- ✅ Focus On: Exhale as you lower your limbs and inhale as you return to the start. Keep a small, constant pressure of your lower back against the floor throughout the entire movement.
- ❌ Avoid: The most common mistake is letting the lower back arch. If this happens, reduce your range of motion. Don’t hold your breath.
Modification for Beginners: Start by lowering only one limb at a time (just a leg, or just an arm). You can also keep your feet on the floor and practice the arm movements alone.
3. The Glute Bridge: Powering Down the Pain
Why It Works for Back Pain: Weak gluteal (buttocks) muscles often lead to “gluteal amnesia”, where the body compensates by overusing the lower back muscles and hamstrings. This is a common contributor to lower back pain.
The Glute Bridge specifically activates and strengthens the glutes, teaching your body to use these powerful muscles for lifting and movement, thereby taking the pressure off your lower back.
Step-by-Step Instructions:
- Starting Position: Lie on your back with your knees bent, feet flat on the floor about hip-width apart, and your arms resting by your sides.
- The Movement: Engage your core and squeeze your glutes. Press through your heels to lift your hips off the floor until your body forms a straight line from your shoulders to your knees.
- The Hold: Hold the top position for 3-5 seconds, focusing on keeping your glutes squeezed.
- Return & Repetition: Slowly lower your hips back to the floor with control. Aim for 12-15 repetitions.
Pro-Tips & Common Mistakes:
- ✅ Focus On: Initiate the movement by squeezing your glutes, not by pushing with your lower back. Keep your core engaged to prevent your back from arching.
- ❌ Avoid: Avoid lifting your hips too high, which can cause hyperextension and strain in the lower back. Your body should form a straight line, not an arch.
Modification for Beginners: If the full bridge is difficult, start with a smaller range of motion, lifting your hips only a few inches off the floor.
4. The Cat-Cow Stretch: Mobilizing the Spine
Why It Works for Back Pain: Unlike the previous stability exercises, Cat-Cow focuses on gentle mobility.
It encourages controlled flexion and extension of the entire spine, which can help relieve stiffness, improve circulation to the spinal discs, and increase body awareness.
It’s an excellent warm-up or cool-down movement for any back pain exercise routine.
Step-by-Step Instructions:
- Starting Position: Begin on all fours in a tabletop position, just like the Bird-Dog.
- The Movement (Cow): Inhale as you drop your belly towards the floor, lift your chest and tailbone, and look slightly forward. This creates a gentle arch in your spine.
- The Hold (Transition): Move fluidly between positions.
- The Movement (Cat) & Repetition: Exhale as you press into your hands, round your spine up towards theceiling, and tuck your chin to your chest. This is one repetition. Flow smoothly between Cat and Cow for 10-15 repetitions.
Pro-Tips & Common Mistakes:
- ✅ Focus On: Synchronize your breath with the movement. Let the movement originate from your pelvis and travel up your spine.
- ❌ Avoid: Avoid pushing into positions that cause pain. The movement should be gentle and feel relieving, not forceful.
Modification for Beginners: Perform the movement with a smaller range of motion. You can also do a seated version in a chair, placing your hands on your knees and gently arching and rounding your back.
5. The Partial Crunch (McGill Curl-up): Safe Abdominal Strengthening
Why It Works for Back Pain: Traditional sit-ups can place significant strain and compressive force on the discs in your lower back.
The McGill Curl-up, developed by renowned spine biomechanist Dr. Stuart McGill, is a scientifically designed alternative.
It strengthens the rectus abdominis (“six-pack” muscle) while maintaining a neutral spine, effectively bracing the core without harmful flexion.
Step-by-Step Instructions:
- Starting Position: Lie on your back with one leg straight and the other knee bent with the foot flat on the floor. Place your hands, palms down, under the natural arch of your lower back to provide support and feedback.
- The Movement: Brace your abdominal muscles. Gently lift only your head and shoulders a tiny amount off the floor—no more than an inch or two. Your lower back should not move or flatten.
- The Hold: Hold this “curl-up” for 7-10 seconds while breathing normally.
- Return & Repetition: Slowly lower your head and shoulders back down. Perform a set number of repetitions (e.g., 5-8), then switch which leg is bent and repeat.
Pro-Tips & Common Mistakes:
- ✅ Focus On: The movement is very small. The goal is to create tension in the abs, not to lift high. Think of your head and neck as a rigid block moving with your upper torso.
- ❌ Avoid: Do not tuck your chin or lead with your neck. Do not try to lift your entire upper back off the floor. This is not a sit-up.
Modification for Beginners: The exercise is already very safe. The key is to start with short holds (3-5 seconds) and a low number of repetitions, focusing entirely on form.
6. The Knee-to-Chest Stretch: Gentle Lumbar Release
Why It Works for Back Pain: This classic stretch provides a gentle release for the muscles of the lower back (erector spinae) and glutes.
By bringing the knees toward the chest, you gently flex the lumbar spine, which can help alleviate tension and stiffness, especially after a long day of sitting or standing.
It’s a passive stretch that feels restorative for many people with general lower back pain.
Step-by-Step Instructions:
- Starting Position: Lie on your back with your knees bent and feet flat on the floor.
- The Movement: Gently draw one knee towards your chest, grasping it with both hands either behind the thigh or over the shin.
- The Hold: Hold the stretch for 20-30 seconds, breathing deeply and allowing your lower back to relax.
- Return & Repetition: Slowly release the leg back to the starting position. Repeat with the other leg. You can also perform a double knee-to-chest stretch by bringing both knees in at the same time. Perform 2-3 times on each side.
Pro-Tips & Common Mistakes:
- ✅ Focus On: Keep your head and shoulders relaxed on the floor. The pull should be gentle, not forceful.
- ❌ Avoid: If you have a suspected disc herniation, this flexion-based stretch may not be appropriate. Consult a professional. Avoid lifting your tailbone excessively off the floor.
Modification for Beginners: If grabbing your shin is uncomfortable, always hold behind your thigh to reduce pressure on the knee joint.
7. The Piriformis Stretch (Figure-4): Unlocking Hip Tension
Why It Works for Back Pain: The piriformis is a small, deep muscle in the buttock that can become tight and irritate the nearby sciatic nerve, causing pain in the buttock and down the leg (a condition known as piriformis syndrome, which can mimic sciatica).
Stretching this muscle can relieve this specific type of nerve-related back pain and improve hip mobility, reducing compensatory strain on the lower back.
Step-by-Step Instructions:
- Starting Position: Lie on your back with both knees bent and feet flat on the floor.
- The Movement: Cross your right ankle over your left knee, creating a “figure 4” shape. Gently press your right knee away from you to begin the stretch. To deepen it, lift your left foot off the floor and loop your hands behind your left thigh, gently pulling it towards you.
- The Hold: Hold for 20-30 seconds, feeling a stretch deep in your right buttock.
- Return & Repetition: Slowly release and return to the start. Repeat on the other side. Perform 2-3 times on each side.
Pro-Tips & Common Mistakes:
- ✅ Focus On: Keep your head and shoulders relaxed on the floor. Flex the foot of the crossed leg to help protect the knee joint.
- ❌ Avoid: Do not pull so hard that you feel pain in your knee or hip joint. The stretch should be felt in the muscle of the buttock.
Modification for Beginners: Perform the stretch while seated in a chair. Cross one ankle over the opposite knee and gently lean forward with a straight back until you feel the stretch.
8. The Plank (and Side Plank): Building Endurance
Why It Works for Back Pain: The plank is an isometric exercise that builds endurance in the entire core musculature—front, sides, and back.
Unlike crunches, it does so without spinal movement, making it a very safe and effective way to improve the spine’s ability to resist unwanted forces.
The side plank is particularly important as it strengthens the quadratus lumborum (QL) and obliques, key muscles for pelvic stability.
Step-by-Step Instructions (Front Plank):
- Starting Position: Lie on your stomach and prop yourself up on your forearms, with elbows directly under your shoulders.
- The Movement: Lift your hips off the floor, engaging your core and glutes, so your body forms a straight, rigid line from your head to your heels.
- The Hold: Hold for as long as you can with perfect form, starting with 15-30 seconds.
- Return & Repetition: Lower your hips to the floor to rest. Aim for 3-5 sets.
Pro-Tips & Common Mistakes:
- ✅ Focus On: Keep your core tight and glutes squeezed. Your body should be a straight line.
- ❌ Avoid: Do not let your hips sag towards the floor or pike up towards the ceiling. Both positions negate the benefit and can strain your back. Don’t hold your breath.
Modification for Beginners: Perform the plank with your knees on the floor. This reduces the lever length and makes the exercise more manageable while you build strength. You can also perform an incline plank against a wall or sturdy table.
Part 4: How to Build a Safe and Effective Back Pain Exercise Routine
Knowing the right exercises is only half the battle. Integrating them into a consistent, safe, and progressive routine is what creates lasting change.
This section provides the practical framework for turning these individual movements into a powerful program for back pain management.
The “Start Low and Go Slow” Principle
When dealing with back pain, enthusiasm can sometimes lead to overexertion and setbacks. The most crucial principle for success is to be patient and gradual.
- Consistency Over Intensity: It is far better to do 10-15 minutes of gentle exercise every day than to do one intense 60-minute session once a week. Consistency builds muscle memory, reinforces proper movement patterns, and steadily increases tissue resilience.
- Gradual Progression: Start with just 2-3 exercises that feel comfortable. Perform them with perfect form for a low number of repetitions or short holds. As you get stronger and more confident over days and weeks, you can gradually increase the duration, repetitions, or add another exercise to your routine.
Listen to Your Body: The Pain Rule
This is the most important safety guideline: Pain is a stop signal. It’s vital to distinguish between the discomfort of muscle fatigue and the warning sign of true pain.
The Rule: You should not feel any sharp, stabbing, shooting, or radiating (traveling down your leg) pain during or after an exercise. A feeling of gentle stretching or the mild burn of a working muscle is normal and expected. If an exercise causes “bad” pain, stop immediately. You can try a modification or skip that exercise for the day.
Creating a Balanced Routine
A comprehensive routine should address the different needs of your spine. Use this table to ensure you are creating a well-rounded program with the exercises from this guide.
| Exercise Type | Goal | Examples from this Guide | Recommended Frequency |
|---|---|---|---|
| Core Stability | To create a “natural brace” and protect the spine from unwanted movement. | Bird-Dog, Dead Bug, Partial Crunch, Plank | 3-5 times per week |
| Glute Activation | To strengthen the glutes to reduce over-reliance on lower back muscles. | Glute Bridge | 3-5 times per week |
| Spinal Mobility | To gently move the spine, relieve stiffness, and improve circulation. | Cat-Cow Stretch | Daily, especially as a warm-up |
| Flexibility | To lengthen tight muscles (hips, back) that pull on the spine. | Knee-to-Chest Stretch, Piriformis Stretch | Daily, especially after exercise or before bed |
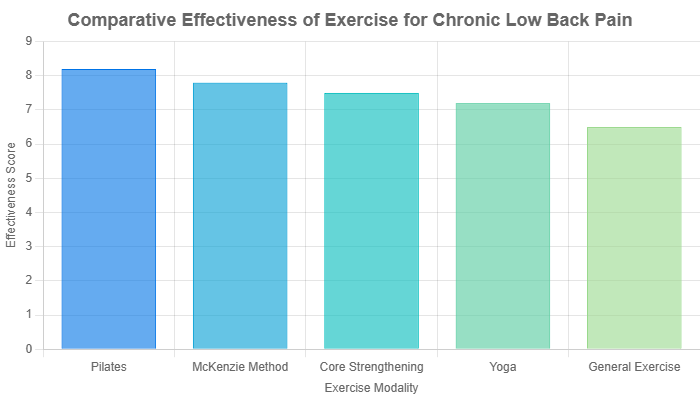
Chart: Comparative effectiveness of different exercise modalities for chronic low back pain, based on aggregated data from systematic reviews. Pain reduction is shown on a standardized scale.
Sample Weekly Plan for Beginners
This is a sample to get you started. Adjust it based on how you feel.
- Day 1, 3, 5 (Strength & Stability):
- Warm-up: Cat-Cow Stretch (10 reps)
- Main Set: Glute Bridge (10 reps), Bird-Dog (8 reps/side), Plank (hold 20 sec, from knees if needed)
- Repeat Main Set 2 times.
- Cool-down: Knee-to-Chest Stretch (30 sec/side), Piriformis Stretch (30 sec/side)
- Day 2, 4, 6 (Active Recovery & Mobility):
- A 20-30 minute walk at a comfortable pace.
- Gentle stretching: Cat-Cow, Knee-to-Chest, Piriformis Stretch.
- Day 7: Rest.
When to See a Doctor or Physical Therapist
While exercise is beneficial for most common types of back pain, certain symptoms are “red flags” that warrant immediate medical evaluation.
According to sources like the Mayo Clinic, you should seek professional help if your back pain:
- Is the result of a significant fall, blow, or trauma.
- Is accompanied by a fever.
- Causes new or worsening bowel or bladder control problems (incontinence or retention).
- Is paired with unexplained weight loss.
- Causes progressive weakness, numbness, or tingling in one or both legs.
- Is severe, constant, and does not improve with rest or a change in position.
A physical therapist can provide a specific diagnosis and create a personalized exercise program tailored to the exact cause of your pain.
Part 5: Are There Exercises You Should Avoid with Lower Back Pain?
Just as important as knowing what to do is knowing what *not* to do. While movement is medicine, the wrong kind of movement can aggravate an already sensitive back.
During an acute flare-up or for those with chronic instability, certain exercises can do more harm than good by placing excessive compressive or shearing forces on the lumbar spine.
Here are some common exercises to approach with caution or avoid entirely when your back is hurting:
- Traditional Sit-ups: This classic exercise causes repeated, loaded flexion of the lumbar spine. Studies by Dr. Stuart McGill have shown that this motion can place hundreds of pounds of compressive force on the spinal discs, potentially worsening a disc bulge or herniation.
Safer Alternative: The Partial Crunch (McGill Curl-up) described in this guide. - Double Leg Lifts: Lying on your back and lifting both straight legs at once creates an enormous lever arm that places immense strain on the lower back. Unless you have exceptionally strong deep core muscles to maintain a neutral pelvis, your lower back will be forced to arch, leading to significant strain.
Safer Alternative: The Dead Bug, which trains the core to stabilize against the movement of one leg at a time. - Standing Toe Touches (with a rounded back): While stretching the hamstrings is important, performing a standing toe touch by rounding the spine can overstretch the sensitive ligaments and muscles of the lower back. It can also put pressure on the anterior portion of the spinal discs.
Safer Alternative: A supine (lying down) hamstring stretch or a seated hamstring stretch where you hinge at the hips while keeping the back straight. - Heavy, Overhead Lifting: Activities like the overhead press or heavy squats require significant spinal stability and load the spine vertically. While these are excellent exercises for a healthy, strong back, they should be avoided during a pain episode and only be reintroduced under expert guidance once you are pain-free and have built a solid foundation of core strength.
The key takeaway is to avoid movements that involve loaded, end-range flexion or extension of the lumbar spine. Focus on exercises that promote a stable, neutral spine.
Part 6: Frequently Asked Questions (FAQ) About Back Pain and Exercise
1. How long does it take for exercises to help back pain?
While some people feel immediate relief from gentle stretching, significant improvement in strength and pain reduction typically takes 2-4 weeks of consistent exercise. Long-term benefits and resilience are built over months of regular activity.
2. Is walking good for lower back pain?
Yes, walking is one of the best activities for lower back pain. It’s a low-impact exercise that promotes blood flow, engages core muscles, and encourages a neutral spine. Start with short, comfortable walks and gradually increase your duration.
3. Should I exercise if my back hurts?
For most non-specific back pain, gentle movement is better than bed rest. Listen to your body and follow the “Pain Rule”. If an exercise causes sharp or radiating pain, stop. If you have “red flag” symptoms, consult a doctor first.
4. Can exercise make back pain worse?
Yes, if performed incorrectly or if the wrong exercises are chosen. High-impact activities or movements that put the spine in a compromised position (like traditional sit-ups) can worsen pain. This is why focusing on form and starting slowly is critical.
5. What is the single best exercise for lower back pain?
There is no single “best” exercise, as the ideal movement depends on the cause of your pain. However, exercises that promote core stability without loading the spine, like the Bird-Dog and Dead Bug, are considered foundational and safe for most people.
6. How do I know if my back pain is muscular or a disc problem?
Muscular pain often feels like a dull ache or stiffness, while disc-related pain is more likely to be sharp, shooting, and may radiate into the buttock or leg (sciatica). A definitive diagnosis requires an evaluation by a healthcare professional.
7. Is it better to stretch or strengthen a sore back?
A combination of both is ideal. Strengthening provides long-term stability and support for the spine, while stretching improves flexibility and provides short-term relief from muscle tightness. A balanced routine includes both elements.
8. Can I do these exercises for upper back pain?
Many of these exercises, particularly the Cat-Cow and Bird-Dog, can also help with mobility and stability for the thoracic (upper) spine. However, upper back pain often has different causes, such as poor posture, and may require additional specific exercises like rows and scapular retraction.
9. What’s the difference between acute and chronic back pain?
Acute back pain is short-term, lasting from a few days to a few weeks. It’s often the result of a specific injury or strain. Chronic back pain is pain that persists for 12 weeks or longer, even after the initial injury has healed.
Part 7: Conclusion
Navigating the world of back pain can be daunting, but this guide has illuminated a clear and powerful truth: you are not helpless.
The ability to build a stronger, more resilient back is within your control.
We’ve learned that back pain is a widespread issue, but it is manageable. The key lies not in prolonged rest, but in purposeful, intelligent movement.
The core principles are simple yet profound: a strong, stable core is your spine’s best defense, flexibility in the surrounding muscles reduces undue strain, and consistency is the engine of progress.
The eight exercises detailed here are not just random movements, they are a curated system designed to build stability from the inside out, mobilize what is stiff, and strengthen what is weak.
Frame this routine not as a chore, but as a daily act of self-care and an investment in your future quality of life. You now have the tools and the knowledge to begin your journey toward relief.
The path forward doesn’t require a heroic effort, only a small, consistent one.
Your next step is simple. Start today. Choose just one or two exercises from this guide that feel good for your body. Perform them with care and attention.
Tomorrow, do it again. By taking these small, deliberate steps, you are actively rewriting your relationship with pain and building the foundation for a healthier, more active life.
We invite you to share your experiences, progress, or questions in the comments section below. Your journey can inspire and help others who are on the same path.
Medical Disclaimer
The information in this article is for informational and educational purposes only and is not intended as a substitute for professional medical advice, diagnosis, or treatment. Always seek the advice of your physician or another qualified health provider with any questions you may have regarding a medical condition. Never disregard professional medical advice or delay in seeking it because of something you have read in this article. If you are experiencing any of the “red flag” symptoms mentioned, consult a healthcare professional immediately.